|
INSTALLATION /
USER MANUAL
These
instructions are fairly easy to follow and can be installed in a very short
amount of time. If however you prefer, you can contact your local plumber
or handyman and they can install the system for you rather quickly.
PREPARATION
FOR INSTALLATION:
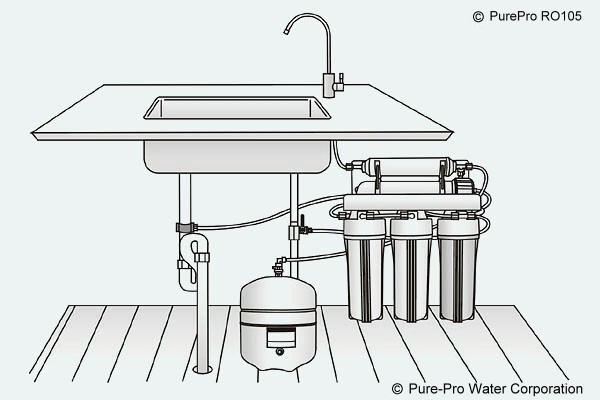
This system
may be mounted in either a vertical or horizontal position and must be
positioned to allow access for service and filter cartridge changing. At
the same time, the assembly should be relatively near the spigot to maximize
flow rate.
The storage
tank can be placed on its side without affecting the performance of the
system. If there is insufficient room under the sink, the tank may
be located in an adjacent cupboard.

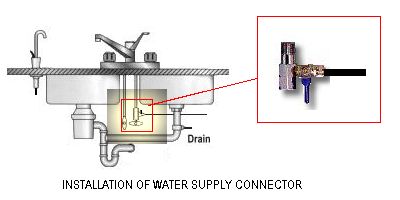
INSTALLATION
OF WATER SUPPLY CONNECTOR:
Easy Connector (Water
Supply Connector + Deliver-Valve)
This water
supply connector that comes with the unit is made up of two parts: Water
Supply Connector 1/2" male x 1/2" female NPT & Deliver-valve 1/4" x
1/4".
|

|

|
|
Water
Supply Connector |
Deliver-valve |
Simply disconnect cold water
line from angle stop bottom or from faucet stud on top. Complete with cone-washer
and seal. Assemble
the water supply connector by inserting the Deliver-valve. Screw the deliver-valve
into the side of the water supply connector using 3 to 4 wraps of Teflon
tape.
INSTALLATION
OF SINK-TOP FAUCET
Most
sinks have an extra hole for the mounting of additional faucets, sprayers
or soap dispensers. If your sink does not have an additional hole,
use the following procedure.
-
Using
a VSR drill with a carbide grinding burr, gently grind away enough porcelain
or enamel to more than accommodate the drill bit (about the size of a dime).
Enough surface material must be removed to expose the base metal.
-
-
Using
the 1/4" drill bit, drill a 1/4" hole through the base metal. Operate the
drill slowly and carefully, especially when the drill is about to penetrate
the metal. If necessary use a drop of two of oil in the hole.
-
Repeat
step 2. Using the 1/2" drill bit.
Mount
the sink top faucet in the hole and using an adjustable wrench (or hand)
to hold the faucet, tighten the 9/16" nut.
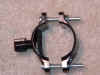
**If it is not
available to drill a hole, please use a faucet-bracket
instead**
INSTALLATION
OF DRAIN SADDLE:
-
Position
as far away from the garbage disposal as possible.
-
The drain
saddle should be installed above the p-trap on the vertical or horizontal
tailpiece.
-
Drill
a 1/4" hole into the drain pipe observing the above position.
-
Mount
drain saddle aligning holes. (Drill bit may be left in saddle hole for
alignment)
-
Carefully
tighten both screws on drain saddle till snug. Do not over tighten
-
INSTALLATION
OF STORAGE TANK:
-
Wrap 4
to 5 winds of Teflon tape around metal tank threads.
-
Hand tighten
plastic shut-off valve to tank. (Firm but not over tight.)
-
Tank should
come from the factory with 8 to 14 lbs. PSI of air when measured empty.
MOUNTING
THE PURIFICATION ASSEMBLY:
***DETERMINE
IF MOUNTING IS NECESSARY THIS CAN BE OPTIONAL.***
-
Mark screw
locations at the desired positions. Use the two holes on back of purification
assembly mounting bracket for marker guides.
-
Screw
wood screws supplied with unit into marked positions. Leave screw heads
out a little.
-
Mount
purification assembly onto screws.
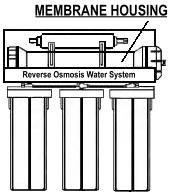
INSTALLATION
OF R.O. MEMBRANE:
** ORIGINAL PACKAGING IS TO PREVENT MEMBRANE DAMAGE DURING TRANSIT.***
-
Remove
the membrane housing cap.
-
Install
the membrane by carefully pushing the spigot end into the socket at the
far end of the housing until completely in.
-
Replace
housing cap. (watch out- the o'ring)
CONNECTING
THE COLOR TUBING:
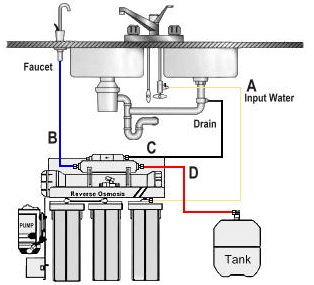
A.
Connect
the WHITE tubing to the water supply connector.
B.
Connect the BLUE tubing to the sink top faucet.
C.
Connect the BLACK tubing to the drain saddle.
D.
Connect the RED tubing to the storage tank.
START
UP PROCEDURE:
-
With everything
connected, turn on the water check for leaks.
-
Make sure
the storage tank shut-off valve is 'OFF' . Open the sink top faucet.
-
Within
a few minutes (up to 15) the water will start to run from the faucet slowly.
-
Let the
water run for at least 30 minutes. This flushes the carbon filters on first
time use.
-
After
initial flushing, open the shut-off valve on the tank and close the sink
top faucet.
-
Tank will
now fill (Usually 2 to 3 hours) After the tank has filled, open the sink
top faucet and drain all the water until the storage tank is empty and
there is only a small flow from the sink top faucet.*** DO NOT USE FIRST
TANK OF WATER.***
-
Close
the sink top faucet. The system is now ready for use.
CAUTION
FOR YOUR SAFETY
Change
filters regularly every 6 to 12 months and have the membrane checked annually.
Automatic Ice Makers require water in the line to work properly. If you
are draining the storage tank or have no water during initial start up
turn off the ice maker until the sink top faucet has a steady flow.
This
Reverse Osmosis RO105 unit is designed to operate at water pressure in
the range of 40 to 85 PSI. At pressure lower than this, the quantity as
well as the quality of water will be reduced. (* If you don't have enough
water pressure, it may be wiser to install one of our pumped
systems instead.) At higher pressure, severe damage to the
system may result. If local water pressure exceeds 85 PSI, a pressure regulator
should be installed, reducing the water pressure into the system.
★★
Download User Manual
(pdf files)
★★
Installation Video (Video)
★★
Installation Video (RO105)
|